This feature allows adding banners for promoting specific products, collections, or any marketing campaigns in search results. You can set the banners to be visible conditionally, depending on what search queries are used by your customers, or show them in any search results lists by default. They can also be shown on particular collection pages if you use our Filters on collections.
The set banner mixes up with products in the product list in the grid view, as shown below:

To configure Banners, you should go to the Searchanise Search & Filter control panel > Merchandising & Promo > Banners section on the left-hand side.
Banners are available for the Game-Changer Full (Advanced) subscription plans and new ones starting from the Essential plan.
Add a banner
Only one banner at a time can be shown in results for the same search term, and only one can be shown for the same collection page.
To add a banner, follow these steps:
- Go to the Searchanise Search & Filter control panel > Merchandising & Promo > Banners section.
- Click the + New banner button.
- Adjust the banner settings:
- Name – enter a banner name to identify the banner. It will not be visible in the storefront.
- Image – upload an image that will display as a banner in the product list grid view.Note
The size of your banner image is up to your desirable outcome. Banners span the whole width of a product card in the grid view and automatically scale down on smaller devices, they don’t get distorted in the process.
- Date range – Set a time period when the banner will be displayed. If it is left unset, the banner will be visible until disabled manually.
- Search Terms – you can add search terms that will trigger the banner on the search results page. The terms can be set in two ways:
- Exact Match – the banner will display only if a user enters exactly this search term.
- Partially – the banner will display if a user enters a search term that contains this search term.
- Collections – you can select collections on which the banner will show.Note
For collection pages, it will work only if you use our Filter on collections feature.
- Banner position – set the number of the banner position in the grid view of the product list.
- Redirect link – enter the URL link that a user will be redirected after clicking the banner.
- Set as default – if you switch it on, the banner will be displayed for all non-specified search terms.Important info
You can set only one banner as default. If you set one more banner as default, the previous one will be visible only if some triggers to display it are set.
- Disable banner – deactivate banner if you are not ready to show it. It will remain in the list, and you will be able to activate it again.
- Click the Create banner button at the top.
That’s it. You’ve just created the banner.
Edit a banner
To edit a banner, follow these steps:
- Go to the Searchanise Search & Filter control panel > Merchandising & Promo > Banners section.
- Click the Edit banner link next to the banner you want to edit.
- Change the settings. To change the image, click on it, and upload the new image.
- Save the changes.
That’s it. The banner has been edited.
Delete a banner
To delete a banner, follow these steps:
- Go to the Searchanise Search & Filter control panel > Merchandising & Promo > Banners section.
- Select the banner that you want to delete.
- Click the appeared Delete selected button at the top.
- Confirm the changes.
Banners prioritization on the storefront
Banners are displayed on all pages of the Search Results Widget. They are not counted as products in the Products per page setting. For example: If Products per page are set to 3, there will be one banner and 3 products on each search results page.
Banners have the following priority order on the search results page:
- Exact match to the search term and date range
- Partial match to the search term and date range
- Exact match to the search term
- Partial match to the search term
- Default banner
When the first condition is met, the rest of them are ignored. E.g., if you have a banner for a specific page that is shown under condition #1 and a default banner, the banner that falls under condition #1 will be shown.
View banner analytics
In the banners list in the Searchanise Search & Filter control panel > Merchandising & Promo > Banners section, you can view banner analytics:
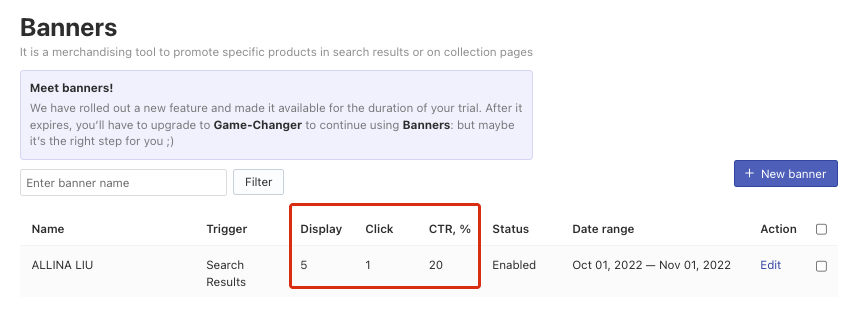
- Display – the number of times the banner has been displayed.
- Click – the number of clicks on the banner.
- CTR, % – the number of clicks on the banner divided by the number of times it has been displayed.
We’d appreciate it if you could take some time to leave a review.