Our Upsell and Cross-Sell functionality is now limited: you can no longer create new recommendation blocks.
However, all of these features are fully available in our Searchanise app for Shopify.
Upsell & Cross-Sell adds Recommendation Widgets to your store pages that display product recommendations based on various algorithms.
The recommendation engine is flexible and supports both automatically generated and manually set up merchandising rules. Various types of recommendations are available, such as New Products, Similar Products, Most Popular Products, and more.
The Searchanise recommendation system makes it easier for your customers to discover new products and helps you increase your online store sales.
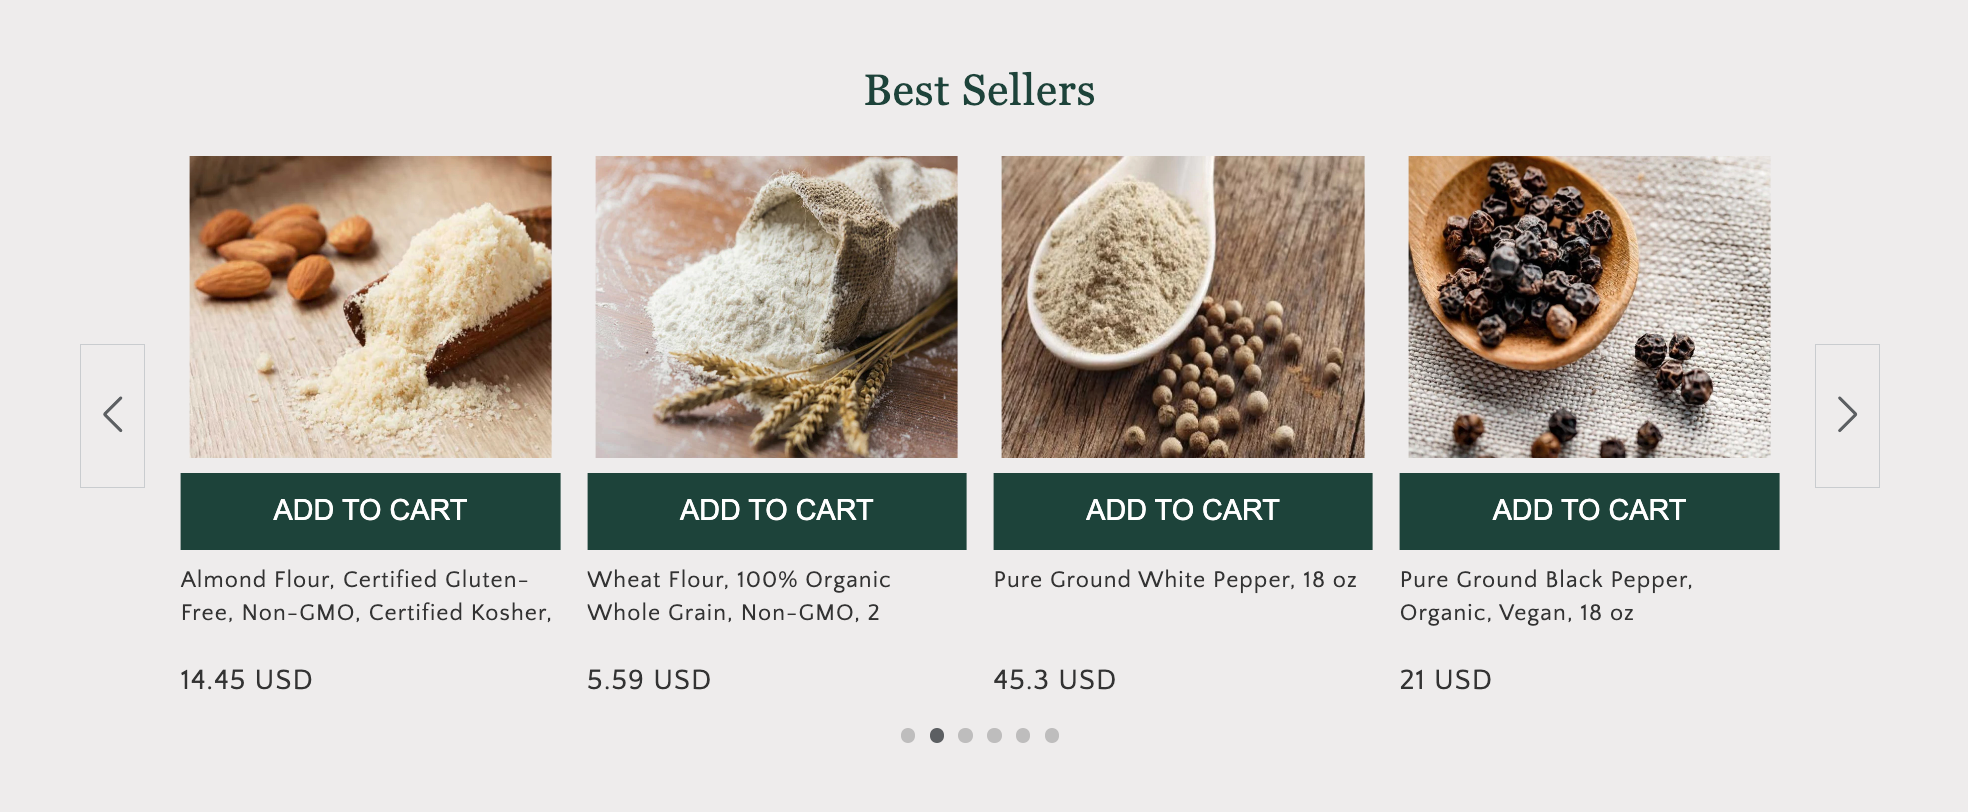
Example of a Recommendation Widget:
Activation in the Theme Editor
You can activate the Upsell & Cross-Sell app by clicking on the button at the upper right. The app will display a widget in your Online Store if it has a visible status.
After you hit the Activate app button, the app redirects you to the theme editor’s App embeds tab. To activate the app, switch the toggle on and save the changes.
To deactivate the app, follow the steps above and switch the embed app off.
Installing a Recommendation Widget
If you use Shopify Online Store 2.0 theme, read Upsell & Cross-Sell: setting up in Online Store 2.0.
If you use a vintage theme, read Upsell & Cross-Sell: setting up on Vintage themes.
If the installed app couldn’t determine your theme version, or you’ve changed your theme, please contact feedback@searchanise.io to make the app work properly.
Types of Recommendation Widgets
You can create several Recommendation Widgets of the following types:
| Type | Description | Placement |
| New Products | Displays recently created or recently published products | Any page |
| Featured Products | Displays products selected manually | Any page |
| Similar Products | Displays products that are similar based on one of the following criteria: product type, tag, vendor, or collection. Your customers will see products that are similar to the product they are viewing at the moment. | Product page |
| Most Popular Products | Displays the all-time bestselling products of your online store | Any page |
| Products by Attribute | Randomly suggests products of a selected product type, vendor, collection, tag, color, size, or discount rate | Any page |
| Customers Who Bought This Product Also Bought | Recommends products other customers bought with the viewed product within the same purchase. Manually added alternatives display when the product has no options bought together. | Product page, cart page |
| Recently Viewed Products | Displays recently viewed products | Any page |
Some widget types have additional specifications:
- Featured Products: Select and add products to the product list that you want to display to your customers. You can reorder the products in the list by dragging them from top to bottom and backwards. The order of products displayed in the widget is set from the top to the bottom of the list.
- Products by Attribute: Select a product attribute by which product recommendations will be sorted and add a specific attribute option from the selector. You can pick up to 6 attributes to narrow the amount of products fitting. In this case, the widget only displays the products that contain all the attributes added to the settings.
- Similar Products: This block can be displayed only on product page.
- Customers Who Bought This Product Also Bought: This block can be displayed on product and cart pages. You can add alternatives to be displayed when the product has no options bought together.
- Recently Viewed Products: Set up the lifetime of recently viewed products.
Creating a Recommendation Widget
You can easily add a Recommendation Widget to your Shopify store. To create a widget, follow these steps:
- From your Shopify admin, go to the Searchanise Upsell & Marketing admin.
- Open the Upsell & Cross-Sell app.
- Click Create Recommendations and select the Widget type.
Whenever you want, you can edit the widget settings on the Edit Recommendation Widget page. You can access this page by clicking on the pencil icon in the Action column of the recommendations list.
After you’ve made changes to the settings, a pop-up notification will appear at the top of the page reminding you to save them: “Unsaved changes”. You can then Save or Discard them.
Editing widget settings
On the Create a new Recommendation Widget page, you can configure properties that are common for all upsell widgets and properties specific to each type.
Common settings include:
-
- Widget status: Select a widget status to manage its visibility in your Shopify store
- Widget title: Enter the title that will be displayed in your Shopify store
- Widget description: Add a description if you want to have any under the title
- Widget display style: Select the layout style of the widget display. Check box to display products in the full width of the window.
- Number of columns on desktop: Set a specific column layout for desktop devices. Select the value from 1 to 5 columns
- Number of products displayed: Set the number of products to be displayed in the widget
- Installation type (on Vintage themes): Add a widget manually to any page or automatically to certain store pages
- Install on (on Vintage themes or with for In the app installation on Online Store 2.0): Select the store pages for widget placement
Settings by widget type include:
- Featured Products: Select products for the widget.
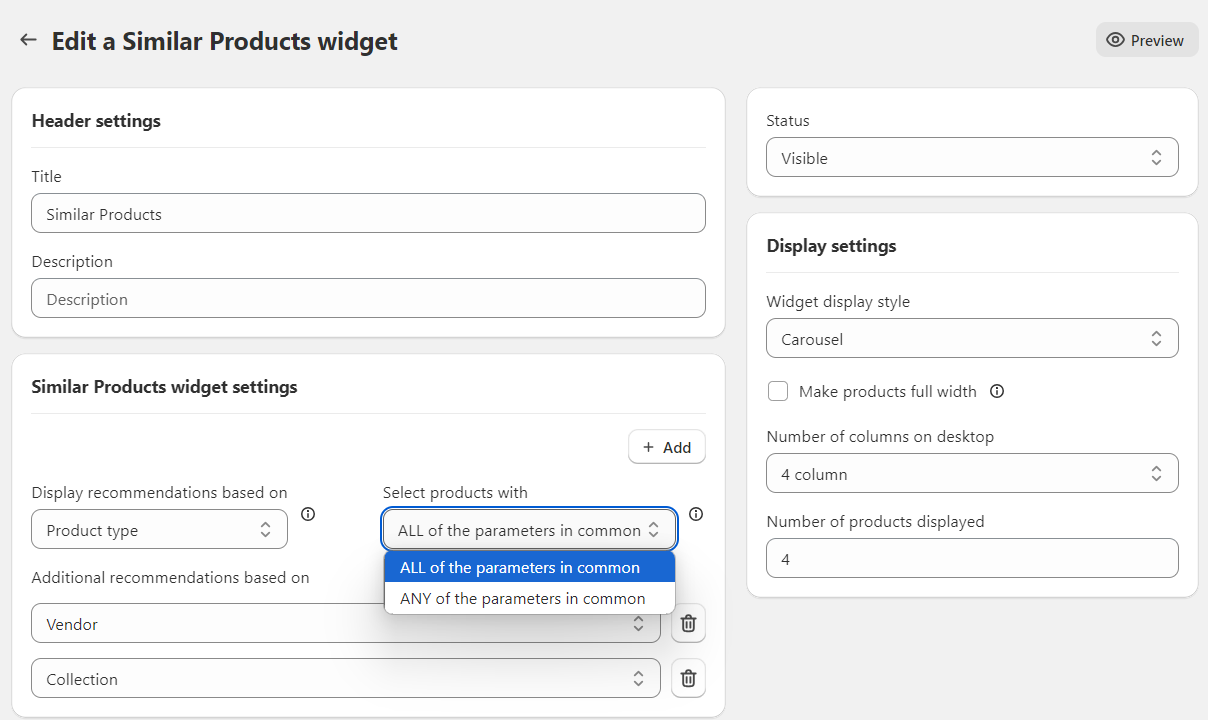
- Similar Products: Select the parameter by which you want to display similar products: product type, vendor, collection, or tag. You can select some or all of them. The setting shown in the screenshot allows you to apply either a strict condition (all parameters must be met) or a lenient condition (products should match any of the parameters).
- Products by Attribute: Choose up to 6 attributes for adding products to the widget — product type, color, size, collection, etc. For multiple attributes, specify the condition: match all or any of the product attributes.
- Recently Viewed Products: Select the time period during which the customers have viewed the products.
Deleting a widget
If you want to delete a widget, click on the delete icon in the Action column of the recommendations list. A dialog box will ask you to confirm the action by clicking Delete.
If you use Shopify OS 2.0 theme, do not forget to remove the app block in the theme editor after you delete a widget in the app settings. See Removing blocks and sections.
Configuring appearance
From the Content & Style tab, you can configure the look and feel of the Recommendation Widgets to fit your theme.
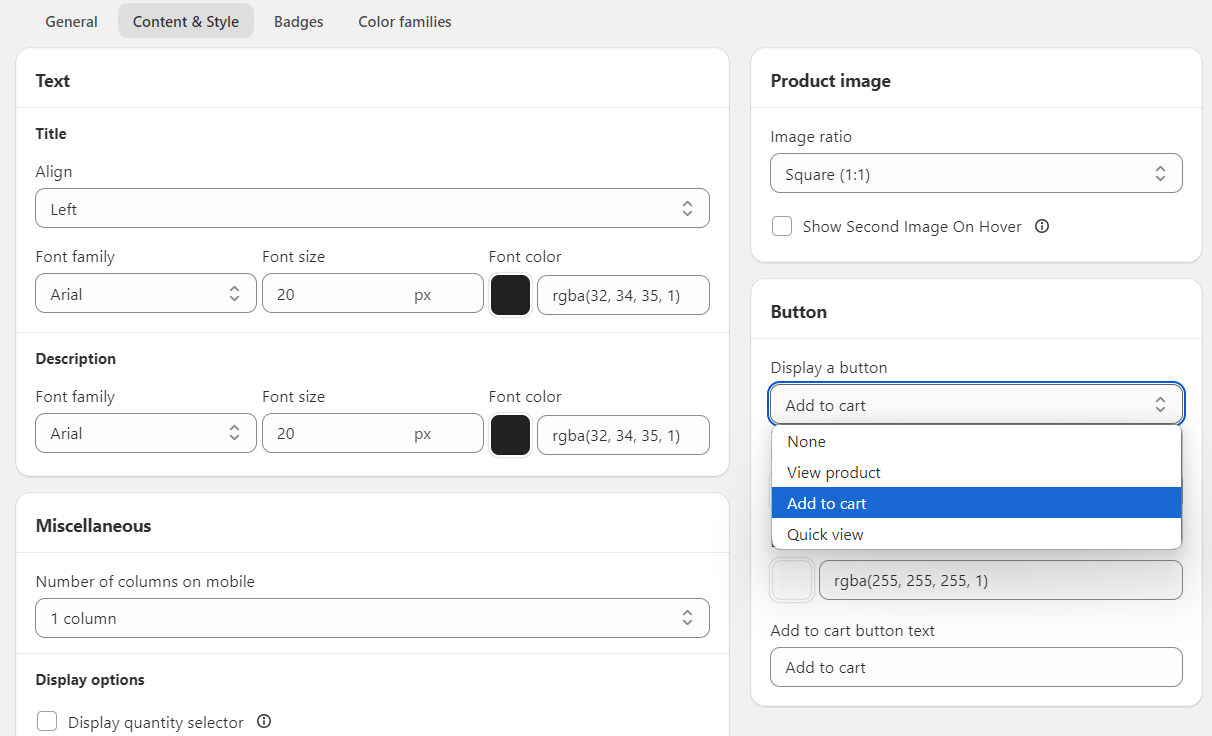
- Title: Customize the widget title and description appearance by setting up its alignment, font family, font size, and color.
- Product image: Select the image ratio for the images of the recommended products:
a. Adapt to image: Uses the aspect ratio of the images. This prevents the images from being cropped.
b. Portrait: Crops the images to use a 2:3 ratio.
c. Square: Crops the images to use a 1:1 ratio.Show second image on hover: when the customer hovers their cursor over the product image, it displays the second product image if the product has one. - Button: Select the button type and enter the text to show in the widget. Configure the colors of the button background and the text.
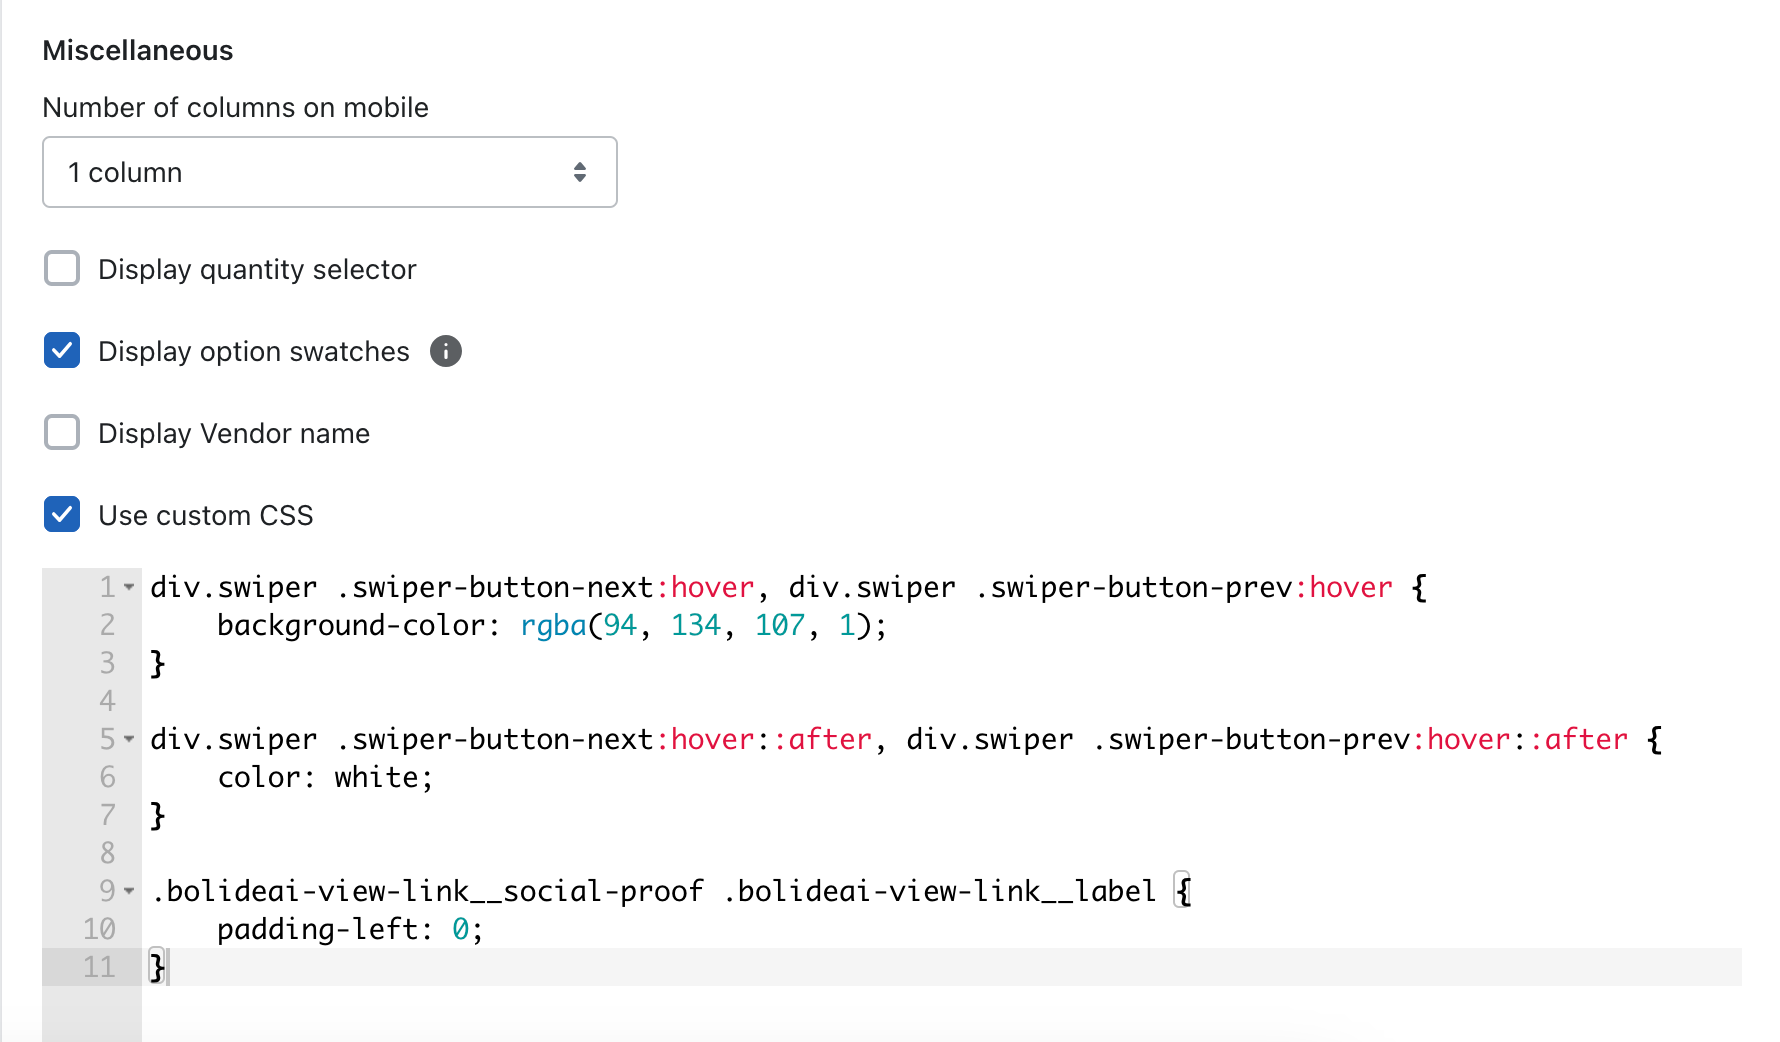
- Miscellaneous:
- Number of columns on mobile: Set a specific column layout for mobile devices. Choose between 1 and 2 columns.
- Display quantity selector (available for the Add to cart button): If enabled, widgets will show a quantity picker
- Display option swatches: If enabled, widgets will show size and color variations
- Display Vendor name: If enabled, widgets will show the vendors of the products
- Use custom CSS: Customize the widget appearance by writing your own CSS rules
5. Filter: Select the products and collections which you want to hide from your visitors.
For your convenience, we’ve described some examples in our help article for Customizing appearance of Upsell & Cross-Sell product blocks using custom CSS.
Badges
You can set up Sale, Sold Out, In stock and Custom badges from the Badges tab to display in the widget.
To edit the badge, follow the steps:
- Click on the pencil icon.
- Set up the badge display.
- Choose the position for the badge display.
- Enter the badge text which will be shown to your visitors.
- Set up the style and the colors for the background and the text.
- Select the badge height and the badge padding.
- Save the changes.
Here are the badge’s additional specifications:
- Sale badge: You can add a sale badge to a product by setting a compare at price that is greater than the regular price. The badge shows over the image for that product on the widget. Learn more about the compare at price.
- Sold out badge: If the product’s inventory level is 0 and Continue selling when out of stock is enabled, the badge appears on the sold out product in the widget. Learn more about the product inventory.
- In stock: If the product inventory level is greater than 0, the badge appears in the widget. Learn more about the product inventory.
- Custom: You can add a custom badge to a product by selecting the collection of products from your store.
Color families
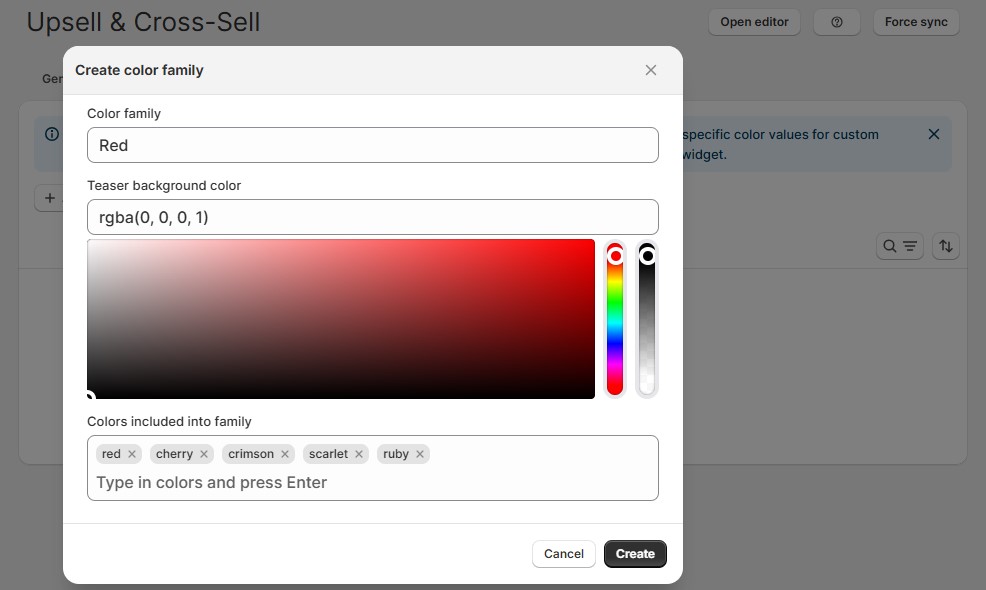
If you use color swatches in the Upsell & Cross-Sell widgets, the Color families setting allows you to group several colors, including complex ones, into a single color display.
For example, you have red, crimson, and scarlet products and want to display them in Upsell & Cross-Sell widgets with color swatches. You add these colors to a color family, ‘red,’ and choose a color that will be displayed in the color swatch. In the Upsell & Cross-Sell widgets, products of this color will display a single color swatch.
To add a new color family:
- Click Add color family.
- Enter the family title in the first field.
- Select the appropriate color in the color picker or enter the RGBA code.
- Type in your product’s color and press Enter. You can add multiple colors for one Color family.
- Click Create to save the changes.

