Introduction
By default, you have several standard filters based on product details, such as product type, collection, price, vendor, etc., and variant options, such as color and size. However, you can make your filters if you require more flexibility than what the default ones offer. The new filters can be based on:
Filters by variant options
To create filters by variant options in your Shopify store, follow these steps:
- Go to Filters > Filter list > Settings tab.
- Type option names separated by commas into the Option names field. The option names are case-insensitive.
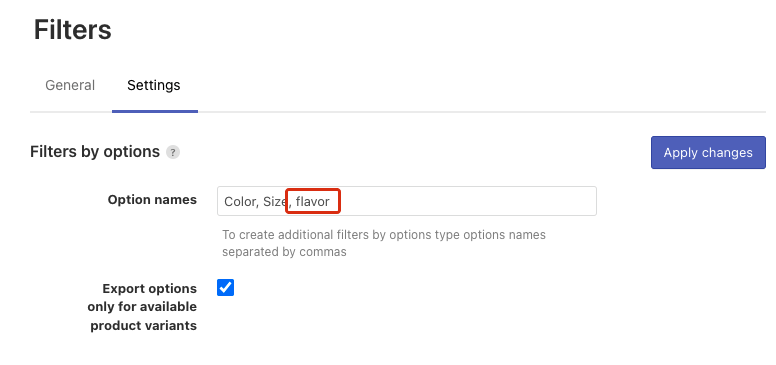
- Select or clear the Export option only for available product variants setting. If you select it, the filters will have values from available variants only. If you don’t, it will have values from all variants.
- Apply the changes.
- Click the link at the top or the Force re-indexation button on the left-hand side to start the indexation.
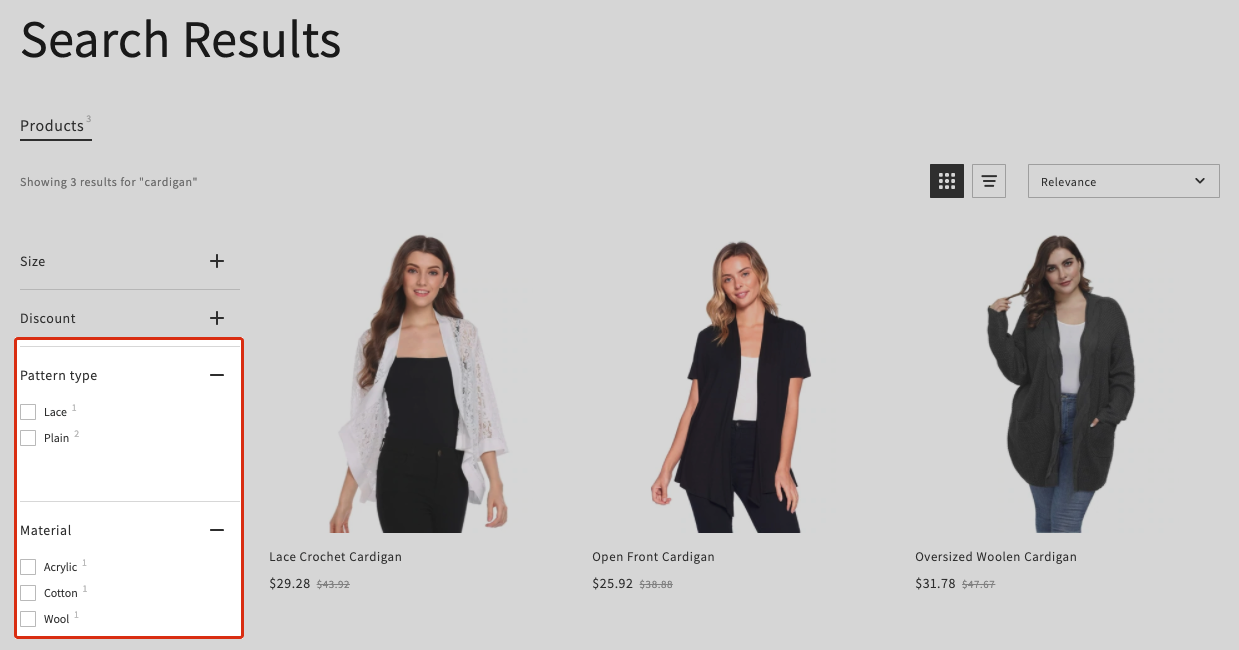
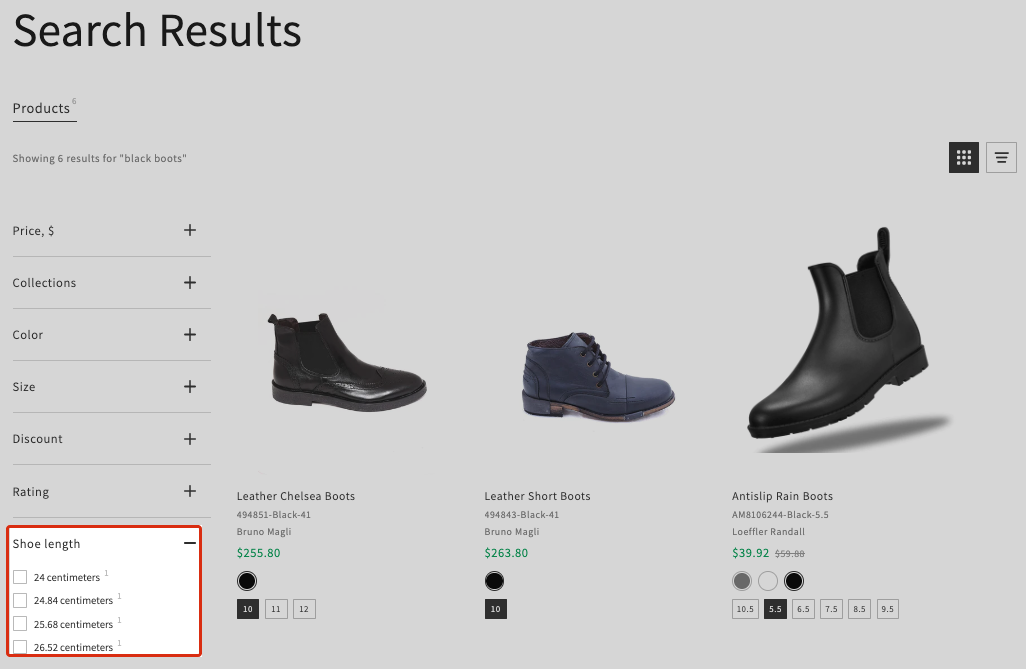
That’s it. After indexing is complete, you can review your new Product option filters in Filters > Filter list > Filters and in the Search Results Widget on your storefront. The filters will use the same names as the values in the Option name field.
Filters by tag prefixes
The tag prefix is the first part of the product tag, with the “_” symbol at the end. For example, if you have tags like Color_red, Color_green, Color_blue, the “Color_” part is the tag prefix. In this case, you can create filters with the Color name and values: red, green, blue.
To create filters by tags based on tag prefixes on Shopify, follow these steps:
- Go to Filters > Filter list > Settings tab.
- Type the one tag prefix or multiple tag prefixes separated by commas into the Create filters by tag prefix field. The tag prefixes are case-insensitive.
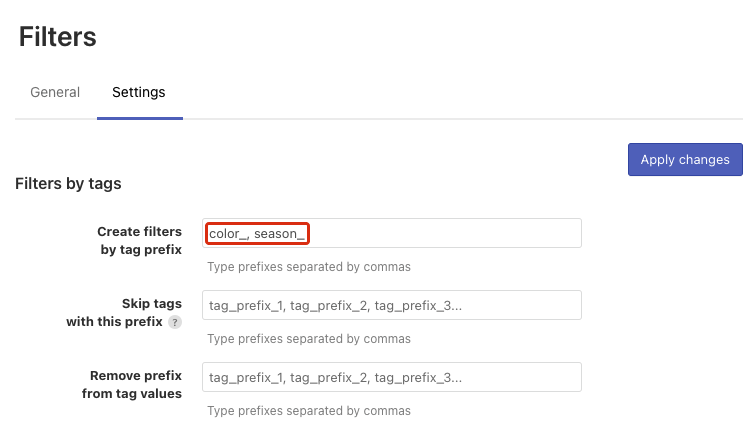
- Apply the changes.
- Click the link at the top or the Force re-indexation button on the left-hand side to start indexation.
That’s it. After indexing is complete, you can review your new Product tag filters in Filters > Filter list > Filters and in the Search Results Widget on your storefront. The filters will use the same names as the values in the Create filters by tag prefix field, without the “_” symbol.
If you use the filters by tag prefixes, we recommend you hide the standard (default) tag filter.
Filters by metafields
Creating filters by product metafields
You need to add a metafield for filtering (Apply to = Filter) and the Product type according to the instructions here.
After the indexation, your new product metafield filters will be available in the Search Results Widget on your storefront.
Creating filters by variant metafields
You need to add a metafield for filtering (Apply to = Filter) and the Variant type according to the instructions here.
After indexation, your new variant metafield filters will be available in the Search Results Widget on your storefront.
Creating filters by category metafields
You need to add a metafield for filtering (Apply to = Filter) and the Product type according to the instructions here.
After indexation, your new category metafield filters will be available in the Search Results Widget on your storefront.
Adjusting numeric filters by metafields
If the metafields based on which you’ve created filters have the Number (integer, float) content type and the one value type in Shopify settings, they will be created as a slider, like the price slider, by default.
Filters by numeric metafields will appear as sliders only for metafields that have the one value type (not the list of values type) added in the Shopify settings.
The negative numbers of the integer filters by metafields will not be displayed on the storefront.
You can adjust the slider filters’ steps from 1, which is from auto to 50, and decimals for the float metafields. To do so, follow these steps:
- Go to Filter list > Filters > Filters tab.
- Click the pencil icon next to the filter you’d like to adjust. The editing page will open.
- Optionally, change the Slider steps setting.
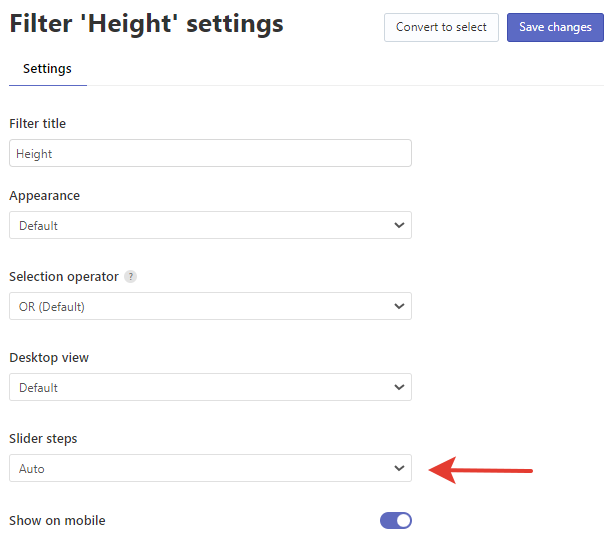
- Optionally, change the Decimals setting if you are adjusting the filter with float content type.
- Apply the changes.
Converting numeric filters by metafields into the select filter
If you don’t want the numeric filter by metafields to be a slider, you can convert it into a select filter. To do so, follow these steps:
- Go to Filters > Filter list > Filters tab.
- Click the pencil icon next to the filter you’d like to adjust. The editing page will open.
- Click the Convert to select button in the top-right corner.
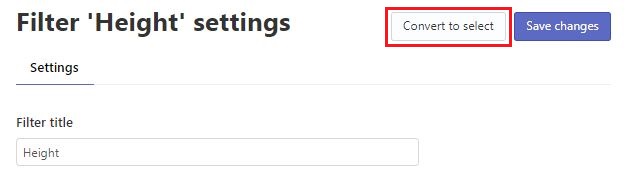
- Apply the changes.
That’s it. The filter is now shown with the options list on your storefront.
Converting numeric filters by metafields into the slider filter
You can adjust the numeric filter by metafields as a slider if you’ve converted it into a select filter. To do so, follow these steps:
- Go to Filters > Filter list > Filters tab.
- Click the pencil icon next to the filter you’d like to adjust.
- Go to the Settings tab, and then click the Convert to slider button in the top-right corner.
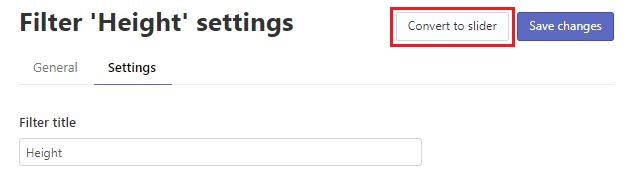
- Apply the changes.
That’s it. The filter is now shown as a slider on your storefront.
We’d appreciate it if you could take some time to leave a review.